
Recipe for an operational PROMICE AWS set-up
This is a walkthrough guide of the current set-up for fetching L0 tx messages and performing L0 to L3 processing on both tx and raw data collected from PROMICE automated weather stations (AWS).
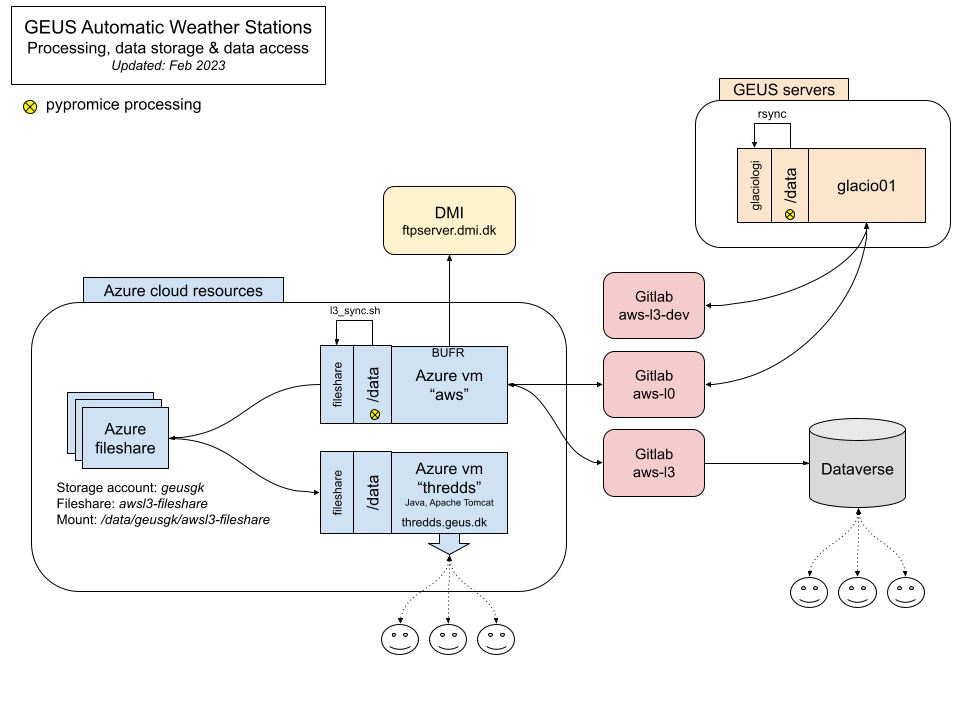
Architecture
This is the current architecture of our processing set-up. An Azure VM azure-aws is used for our operational live processing, whilst an internal server glacio01 runs in parallel for developments and experimental processing.
Ingredients
There are several ingredients you need to perform:
- email message »
L0 tx»L3 txprocessing L0 raw»L3 rawprocessing
These ingredients and their directory structuring is shown below (be aware that only important subfolder components are listed here):
pypromice_aws
│
└───aws-l0
│   │
│   └───raw
│   │       config
│   └───tx
│	    config
│
└───aws-l3
│   │   AWS_station_locations.csv
│   │
│   └───raw
│   └───tx
│   └───level_3
│
└───aws-operational-processing
│       l3_processor.sh
│       bufr_wrapper.sh
│       restructure_l3.sh
│       syn_l3.sh
│
└───credentials
│       accounts.ini
│       credentials.ini
│       last_aws_uid.ini
│
└───PROMICE-AWS-data-issues
│   │
│   └───adjustments
│   └───flags
│
└───pypromice
    │   setup.py
    │
    └───bin
    │       getBUFR
    │       getL0TX
    │       getL3
    │       getData
    │       joinL3
    │
    └───src/pypromice
AWS L0 Gitlab repo
This is the Gitlab repo space where PROMICE and GC-Net AWS Level 0 data collected in the field (raw stm) and transmitted (tx) can be found. You can make a local copy of this repo using git clone. This is only open to GEUS Glaciology and Climate personnel.
git clone https://geusgitlab.geus.dk/glaciology-and-climate/promice/aws-l0
And to grab the latest copy of this data, use git pull after navigating to the repo’s local directory
git pull
AWS L3 Gitlab repo
This is the Gitlab repo space where PROMICE and GC-Net AWS Level 3, L3, processed data is held. You can make a local copy of this repo using git clone. This is only open to GEUS Glaciology and Climate personnel.
git clone https://geusgitlab.geus.dk/glaciology-and-climate/promice/aws-l3
And to grab the latest copy of this data, use git pull after navigating to the repo’s local directory
git pull
aws-operational-processing repo
This is where our wrapper scripts reside for running each processing step.
git clone https://github.com/GEUS-Glaciology-and-Climate/aws-operational-processing.git
The three main scripts used in the processing are l3_processor.sh, bufr_wrapper.sh, restructure_l3.sh and sync_l3.sh. The latter three are called within l3_processor.sh. Together, these perform the following steps:
- Check for remote changes to the
L0andL3Gitlab repositories L0 txmessage retrievalL3 rawprocessing (if any changes are detected in the L0 RAW filesL3 txprocessing (for files where new L0 TX messages are present)L3 rawandL3 txdata merging- Push changes to the
L0andL3Gitlab repositories - Push Level 3 files to the mounted Azure fileshare which then propogates to the thredds server
- Perform post quality checks and format instantaneous measurements to BUFR formatting
- Push BUFR files to the DMI ftp server
If you don’t want to perform one of these steps then please comment these sections out.
This bash script can run routinely using cron, which can be accessed using crontab -e.
0 */1 * * * . /home/USR/.bashrc; cd /data/pypromice_aws/aws-operational-processing; ./l3_processor.sh > process_stdout 2>process_stderr
In our department, l3_processor.sh is set to run once an hour. If you intend to set-up your own operational processing then just make sure to update the directories.
pypromice
The pypromice toolbox is for retrieving, processing and handling PROMICE datasets. To run pypromice, some packages are required so you need to make a new Python 3.8 environment and install these packages. We typically make a Python environment and install these packages using conda.
conda create --name py38 python=3.8
conda activate py38
conda install xarray pandas pathlib
pip install netCDF4
Then clone the pypromice Github repo and perform a local pip install.
git clone https://github.com/GEUS-Glaciology-and-Climate/pypromice.git
cd pypromice
pip install .
Additional packages are required if you wish to use pypromice’s post-processing functionality:
conda install -c conda-forge scikit-learn
Once the pypromice toolbox is cloned and installed, the toolbox can be checked with its in-built unittesting:
python -m unittest src/pypromice/tx/tx.py src/pypromice/process/aws.py src/pypromice/get.py
Note that for WMO data ingestion development, eccodes, the official package for BUFR encoding and decoding, is needed to perform the BUFR formatting. This can be a tricky installation, so first try to install it with conda-forge:
conda install -c conda-forge eccodes
If the environment cannot resolve the eccodes installation then follow the steps documented here to download eccodes, and then install eccodes’ python bindings using pip:
pip3 install eccodes-python
PROMICE-AWS-data-issues
This repo is where we retain all manually added edits for flagging and fixing the AWS datasets.
git clone https://github.com/GEUS-Glaciology-and-Climate/PROMICE-AWS-data-issues.git
This flagging and fixing step occurs in the pypromice Level 1 L1 to Level 2 L2 processing step.
Credentials for email access
Make a directory called credentials and place the following three files in this space:
accounts.ini- contains the account information for retrieving TX messagescredentials.ini- contains the account passwordlast_aws_uid.ini- contains a number which indicates the id of the last readtxmessage from email
Account and credential information is for GEUS Glaciology and Climate personnel only and should never be shared with anyone else. Please ask the data scientist team for access to these files.